Excluding an IP Address in Google Analytics is an easy thing to do to ensure better quality data. Many times developers, programmers, company staff, and other people can unknowingly inflate and skew analytic data as they use the site for testing, sales calls, and support. Ensuring that you get clean data is a high priority, and that’s what we will tackle here.
Do You Have A Dynamic Or Static IP Address?
Before you begin, you’ll need to determine what kind of IP address you have. Your IP address is a numerical number that your ISP assigns to your connection, and IP addresses can be “static” or “dynamic”. A Static IP means that your IP address never changes, whereas a Dynamic IP can change from time to time.
You will have to ask work IT department, or give your ISP a call. They are the only ones that can tell you if you have a static or dynamic IP address – there really isn’t any other way to tell this information. If you have a dynamic IP address, you’ll have to do things a bit differently to exclude internal traffic from Google Analytics to get the best results – if you use the guide below, you can get results for a time until your Dynamic IP changes, and then you will have to repeat them again.
OK, I Have A Static IP Address – So Now What?
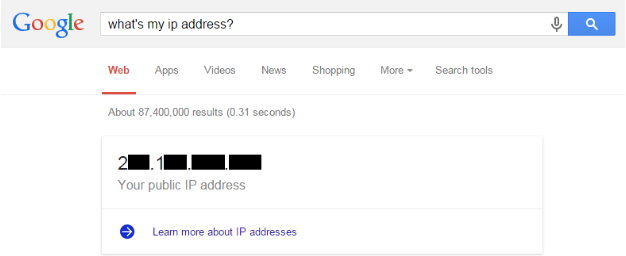
Great, you’ve determined you have a static IP address, but maybe you aren’t exactly sure what it is? It will be something like 12.23.34.123, so if you don’t have something like that, then you’ll need to ask Google. Seriously, searching Google for “what’s my ip address” will tell you what your IP address is of your current network. Be sure to do this from inside the network you wish you exclude.
Sadly, Google can’t tell you if you are static or dynamic, but by know you already know because you asked your IT department, or called your ISP, right? Right?
How Do I Filter My IP Address?
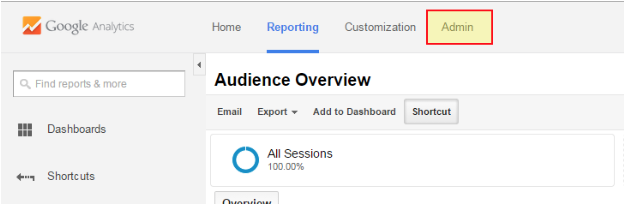
In your Analytics Account, you’ll want to click on “Admin” to get into the Analytics Admin.
Add Filter
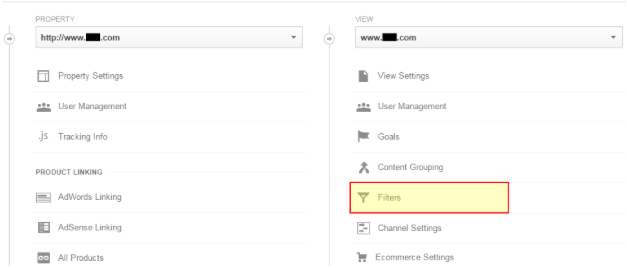
Select the View that will have the IP Address filter added, and then go to Filters. If you aren’t using the two view best practice, check out our Filtered and Unfiltered post on how to set this up.
Create New Filter and Filter Name
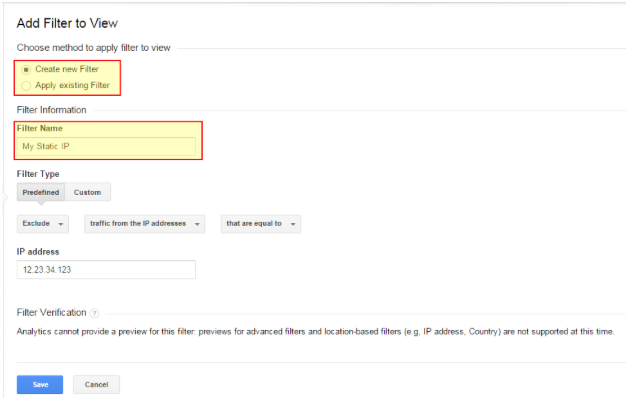
Let’s select to “Create new Filter”, and give it a name. Here I’m naming it “My Static IP”, but you should name this something that describes your network, such as “Exclude Work IP”.
Filter Type And IP Address
Next, let’s select a Filter type of “Predefined”. Use “Exclude”, “traffic from the IP addresses”, “that are equal to”, and enter your static IP address in the given textbox and click “Save”

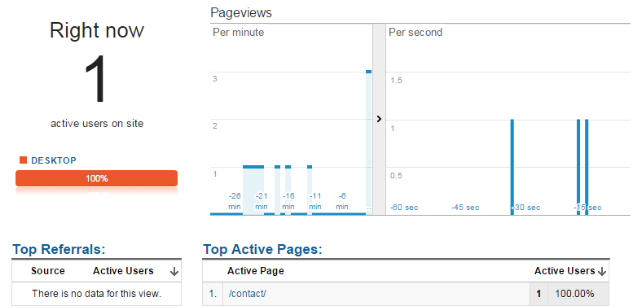
Testing Our IP Address Filter In Google Analytics Real-Time
To test our filter, we should navigate to lesser-viewed pages in our Unfiltered view to see that we are showing, and the switch back to our Filtered to see that our tracking is working there.
Unfiltered View
Then, switch to our Filtered view and see if the same pages are showing – they should not be.
Filtered View
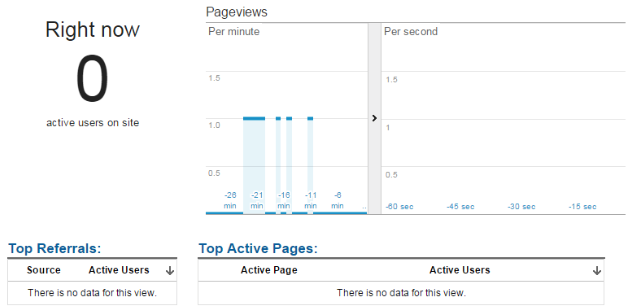
Great – we have successfully blocked our IP address in Google Analytics. This will prove to be immensely useful as you gain better insights and higher quality metrics.